$4.99 Shipping over $49 w/coupon DI499 | 3,050+ Products | 97 Brands | 12,000+ Reviews | 1,900+ Detailing Articles
Close Menu
Clean ⋅ Shine ⋅ Protect
Cookies are disabled in your web browser. To shop with Detailed Image, please turn cookies on and then refresh the page.

Microfiber Packages for Any Detailer

January 23rd, 2008

Microfiber towels and microfiber products have quickly become industry standard for high quality detailing. Microfiber towels have become the unsurpassed leader primarily because of their ability to safely collect particles. This may seem simple but no other material has even come close to achieving what microfiber has. Microfiber is essentially an ultra fine strand of yarn, made primarily from polyester. The material is approximately 1/100th of the thickness of a human hair, yet extremely strong. A cross sectional picture of one strand would look round, but it goes through a process that removes micro wedges from the strand. Upon completion a cross-sectional picture of one strand would look similar to an asterisk (*). This greatly increases the surface area of each strand and gives particles a place to easily collect. Best of all this material is totally safe to use on ultra delicate surfaces that can easily look dull with fine scratches and swirls. The microfiber products in these kits are washable too (check our guide to properly caring for microfiber). The microfiber towels included in these kits are made from the some of the finest microfiber strands available. Each one has a different weave which helps it specialize in certain kinds of tasks that are outlined below.

The All Purpose Microfiber Towel is probably the towel has the most versatility and uses. One of its ideal applications is removing clay lube, polishes, glazes, sealants and waxes from the clear coat. Polishes can be especially difficult to remove and a clean All Purpose Microfiber Towel makes that job much easier. Its low to medium nap gently collects particles while not risking harm to your finish. The All Purpose Microfiber Towel also works great with leather care, glass care, wheel care and so much more. This towel has virtually unlimited applications while caring for your automobile or home.

The Ultra Plush Microfiber Towel has a different texture on each side of the towel. One side has a low to medium nap and the other side has a thick nap. The thick nap makes this towel perfect for quick detailing, spray on sealants, spray on waxes and final wipe downs of sealants and waxes. The best part about this towel is how effectively it removes any one of these products from your paint. Don’t leave behind streaks and residue, remove the product right the first time with the Ultra Plush Microfiber Towel. This towel is also great for interior dustings, cleaning DVD and Navigation screens, coated hardwood and other delicate surfaces.

As the name insinuates the reTHICKulous Microfiber Towel is ridiculously thick and plush. No towel we have ever used or seen is even close to this towel. On average it’s three times heavier than a typical microfiber towel. It’s extremely thick and plush which makes it ideal to use on your most valuable and delicate surfaces. This towel is perfect to use on any delicate surface that you want to be absolutely sure no scratches are added to. You can use this towel on painted surfaces to remove almost every product. When you use a quick detailer to clean your paint this towel can safely absorb contaminants. It carefully glides across the surface and gently absorbs particles, ensuring nothing is grinded in to the surface. You may also want to use this towel on DVD and Navigation screens, coated hardwood, gauges, etc. Around the home this towel is perfect for TV screens, glasses, lap tops, fine china, collectibles and more! When you have to have the best this is the towel of choice!

Whether it’s applying your favorite wax or leather care the Microfiber Applicator Pad is a great product of choice. The inside of the microfiber applicator is a soft foam material that is wrapped in microfiber. Apply your favorite wax safely and easily with this applicator and rinse it clean when you’re done. It’s also great at applying leather care products or really any product that should be buffed on. No matter what you need to apply the Microfiber Applicator Pad is a great universal applicator for the job.

Drying your vehicle with old towels and rags is not only dangerous, but generally not too effective. The Microfiber Waffle Weave Drying Towel is the exact opposite because it’s super absorbent with it’s waffle weave texture and paint safe microfiber material. The towel is approximately 25” x 32” and will continuously soak up more and more water, holding up to 10 times its normal weight. Simply put it down on any area of your vehicle that is wet and watch how it aggressively soaks up all the moisture it can.

Clean and clear glass is key to seeing things early and driving safely. Cleaning the glass is easy, but leaving no streaks behind is the challenging part. The key is to spray your glass cleaner on one microfiber towel and clean the glass. Then use 1 – 2 Glass Microfiber Towels to remove the remaining residue. These towels have an extremely low nap and specialize in making solid contact with the glass and leaving no lint behind. The pressure you exert is more evenly distributed throughout the towel, so no residue can be passed over. With this process you’ll be amazed at just how crystal clear your glass can be.

A Two Sided Microfiber Polishing Towel will help you polish metal and clear coated surfaces like you have never polished before. One side of this towel is textured, while the other side is totally smooth. Apply metal polishes to the textured side and buff them on to metal wheels, trim, exhaust tips and more. This will release deeply embedded contaminants, oxidation, corrosion, brake dust and more. Next flip the towel over and use the smooth side to remove and remaining residue. This process will leave your metal surfaces with a luminous glow that is sure to catch the eye.

Microfiber Gloves
are great products to have around for cleaning your vehicle and around the house. When you want to handle any delicate surface or clean with ease use these gloves. They are designed to fit any sized hand and clean virtually any surface. The unlimited applications of these gloves make them a perfect universal tool for detailers.

Treat your vehicle to the best car care products available with Detailed Image’s Microfiber Kits. These packages will help you get more out of each detail and take your detailing to the next level. You are sure to clean more effectively and safer with the top automotive detailing products. You’ll notice a dramatic difference in your results with your very first use and for years to come!


New Car Prep Explaination and Package

January 14th, 2008

Purchasing a new vehicle is the perfect time to step up and learn as much as possible about detailing. One thing we try to instill in our customers minds is that it is much easier to prevent a problem than it is to correct one. New vehicles can be delivered with more imperfections than you know. Most dealership detailers do not know how to properly wash or detail a vehicle and can often leave new customers with horrible swirl marks, water spots, bird dropping etchings and much more. They often use products that fill in and hide these imprefections, so you do not typically notice them until you’ve brought your vehicle home and washed it for the first time. We highly recommend performing your own new vehicle prep to prevent spending time fixing the dealerships mistakes.

Here’s what our Premium New Car Prep Package includes:

If you added up each item individually, this package would cost nearly $600! We are offering this Premium New Car Prep Package for a price of $449.99!

This package will outline everything you need to perform your own new car prep as well as properly maintain your vehicle afterwards. Lets start with the washing and drying process. This is one of the most important steps in any detail because it is the process you will perform the most and it is also the step where the most imperfections are often added to the paint. Learning about the proper washing and drying techniques will minimize adding imperfections (prolonging tiresome polishing sessions) and keep your vehicle looking newer longer. We recommend starting with 3 wash mitts. The first is for your upper panels, say from your knees up. We advise using a sheepskin wash mitt for these panels as they are the safest wash mitt available. Next is another sheepskin wash mitt for your front and rear bumper as well as the lower panels. Keeping this mitt seperate from your primary mitt will minimize adding imperfections to the larger upper panels. Finally, we suggest using a Lake Country Ulti-Mit for your wheels, tires and wheel wells. This is a foam mitt, so it is more durable than the sheepskin mitt, which makes it perfect for properly cleaning your wheels.

For a quality automotive shampoo with lots of suds, great lubricity, gentle cleaners to not strip your sealant or wax and a great smell, we recommend Poorboy’s Super Slick & Suds. A little goes a long way with this shampoo. When washing your vehicle, you should be using a 2 bucket wash system. One bucket should be filled up with suds and water, and the second should be filled with just water, this is your rinse bucket. We recommend putting a Grit Guard Insert into your rinse bucket to help release contamination and keep dirty water towards the bottom of your bucket. After washing a couple of panels and you need more shampoo, simply dunk your wash mitt into the rinse bucket, gently glide it across the Grit Guard Insert and dunk it back into your shampoo. Think of this as added insurance for your paint.

We recommend using the sheeting method prior to drying your vehicle. After you have rinsed off your vehicle for the final time, remove your spray nozzel. Flood the surface of the vehicle from the top down. The flooding creates a “sheeting” effect that will self dry the vehicle. What I do is start from the top of the vehicle and move left to right with the hose. On the way back, right to left, lower the hose to the point where the water is falling and proceed to “catch” the falling water from your initial pass. Continue this method until you reach the bottom of the car. Drying your vehicle is where a majority of imperfections occur. Using a paint safe waffle weave drying towel to absorb water remaining on your paint will help minimize adding swirls and scratches to your clear coat.

Using a clay bar will help remove any embedded contamination that did not come off during a normal wash. We recommend claying brand new vehicles for multiple reasons. New vehicles can travel a very long distance either via train, boat or truck. Each method of transportation subjects your vehicle to contamination in the air, such as rail dust, smog, ocean water. Also, using a clay bar on a brand new vehicle will help ensure that you remove all of the adhesive used to keep the plastic on your vehicle during delivery. We’ve included a 200g Fine Grade Clay Bar which is large enough to cut into many pieces for multiple uses. We suggest using Poorboy’s Spray & Wipe as your clay lubricant, as this quick detailer has lots of cleaning agents in it, making it perfect for maximizing your clay bar experience. We recommend pouring the Spray & Wipe into a 4oz Pump Spray Bottle to achieve a fine mist to make sure you do not waste any product.

After washing and drying, then using a clay bar, your vehicle should have little to no contamination remaining on the surface. The next step is polishing your paint. We’ve included two polishes in our Premium New Car Prep Package, Klasse All In One and Menzerna PO106FF. If you are performing the entire prep work for your vehicle yourself, your vehicle may not have many or any swirls or other imperfections in the paint. This is where Klasse All In One is a great option. This is a non-abrasive chemical polish that also leaves behind an ideal surface for a sealant or wax to bond to. If you do have minor swirls and imperfections then you may opt to use the Menzerna PO106FF polish. This polish is designed to work with a buffer, but will perform fine by hand, especially if you are just removing minor imperfections. We’ve included 2x 2oz Dispenser Bottles to pour the Klasse AIO and PO106FF into so you can monitor how much polish you are using per coat. On average, you should use around 1.5 ounces per coat or less. This may take a few times to get used to, but shoot for using less than 2 ounces to start. It is nice to have both a chemical polish and an abrasive polish on hand because you may not always want to use the abrasive polish if you care for your paint properly. Either polish will also ensure that any dealer applied sealant or wax is completely removed and you are starting with a fresh surface. If you opt for the PO106FF polish, you may still want to follow up with Klasse All In One to provide an ideal base for your sealant to bond to, but this is optional.

We recommend applying both a sealant and a wax to your paint. Sealants will provide durable protection for 3 ~ 6 months (pending on weather conditions, miles driven, stored in a garage or outside, how frequently the vehicle gets washed, etc.). You sealant will be your underlying coat of protection and goes on after polishing. We chose the Menzerna Full Molecular Jacket 16oz for a few reasons. It is the easiest product to apply and remove, it leaves your surface very slick, and it looks great on any color vehicle. We’ve included another 2oz dispenser bottle for the FMJ to monitor how much product you use. For sealants, try to shoot for 1 ounce of product per coat (on a mid sized vehicle). Applying two or three ultra thin coats is much more effective than 1 thicker coat. Before applying a second coat or deciding to top it with a wax, you’ll want to allow 24 hours for the sealant to cure. This means apply a coat, remove it, and wait 24 hours before applying anything else. This time allows your sealant to properly crosslink and bond to your clear coat.

After applying your coat(s) of sealant, and you’ve allowed 24 hours between your last coat, top the Menzerna FMJ with a natural carnauba wax for additional protection and increased depth and gloss. We choose the P21S 100% Pure Carnauba Wax because of its durability, ease of application and removal, and outstanding depth and gloss on all colors. Your coat of wax will provide a durable protection that will help in preventing water spots, bird dropping etching and other forms of contamination that can damage your paint. Since wax beads water better than sealants, your maintenance washings will go smoother, especially when you perform the sheeting method prior to drying. You can dry nearly your entire vehicle without putting a towel to your paint.
Each polish, sealant and wax should be applied with either a foam applicator pad or microfiber applicator pad, and removed with an All Purpose Microfiber Towel. Each product usually will require a few towels to completely remove. If you use 1 towel per coat, you will often find streaks left behind since the towel becomes saturated with product. After you notice the product becoming difficult to remove, switch to a fresh side of the towel or switch it out for a new one.

Wheel and tire care can be pretty simple when you care for them properly from the beginning. We advise taking precautions to prevent stubborn brake dust build up, which is why we highly recommend the Poorboy’s World Wheel Sealant. This barrier of protection for your wheels will help prevent brake dust from adhering to your wheels, making regular maintenance a breeze with the Super Slick & Suds shampoo and your Lake Country Ulti-Mit. Follow up your wheel protection by applying some Poorboy’s Bold ‘n Bright to your tires, with the Lake Country Tire Applicator. This water based dressing will be absorbed into your tires and provide a nice gloss. Bold ‘n Bright is safe for your tires and actually nourishes your rubber, keeping them soft and flexible, rather than drying them out and browning them like a silicone based dressing. This product also will not sling up onto your paint.
Interior care is kept pretty simple, with a theme of protection. If you are starting with a brand new vehicle, there probably won’t be much that needs to be cleaned. For your interior surfaces that are vinyl, rubber, plastic, and leather, give them a bold matte finish and UV protection with 303 Aerospace Protectant. For your carpet and mats, protect them from stains with 303 High Tech Fabric Guard. We’ve included a 4oz Pump Spray Bottle for both of these products so you can monitor your product use and get the most out of each bottle. If any of the above mentioned surfaces need to be cleaned to remove a stain, use some 303 Cleaner & Spot Remover before applying your protection. Right off the bat, your leather can be protected with just the 303 Aerospace Protectant, but for maintaining your leather, Poorboy’s Leather Stuff is a great option. This product gently cleans and conditions, while leaving behind some UV protection and a great leather scent. This is the perfect 1 step product for coated leather surfaces.
Stoner Invisible Glass is what we recommend for cleaning both interior and exterior glass, and best of all, it is safe for tinted windows. The most common thing we notice when people complain about streaky glass is that they over apply glass products. A small mist is all that is needed to clean a window or two. We recommend applying the Invisible Glass with an all purpose microfiber towel, working it in slowly from left to right, then up and down. Take a seperate, clean all purpose microfiber towel and wipe off any residue left behind, exerting pressure with your fingertips and working slowly. Follow up with your Glass Microfiber Towel to ensure a streak free finish.

Your Ultra Plush towels and reTHICKulous towels should be reserved for delicate surfaces, quick detailing, and final wipe downs. We recommend washing these towels separate from your all purpose towels and waffle weave drying towels.
Finally, your engine bay can be cleaned with the 303 Cleaner & Spot Remover and protected with 303 Aerospace Protectant.
We’ve included some detailed how-to guides on the right to help further educate you on the auto detailing process. With the premium new car kit you’ll be able to perform your own professional new car prep as well as properly maintain your vehicle for years to come!

Maximizing Microfiber Towels

November 8th, 2007

Microfiber towels have become a standard tool for high quality detailers. The ultra-soft fiber’s ability to safely lift and collect particles makes it ideal for so many parts of the detailing process. These towels can be a major investment for detailers who want to ensure they are using the proper products with good technique. A full detail can easily use 10 – 50+ microfiber towels. Since you will be using so many towels we have come up with some suggestions to help users maximize their microfiber towels performance and longevity.

One of the major benefits of microfiber towels is their ability to safely clean surfaces that can be easily scratched, such as the clear coat, coated wood, DVD and navigation screens, gauges, etc. A brand new quality microfiber towel will not add scratches to these surfaces, so it’s very important to keep your microfiber towels clean, for as long as you can. Never use these towels on an area that may trap large particles that could potentially be abrasive. Try not to drop your towel, put it down on a contaminated surface, or place it where it can fall or be blown on to the ground. Clean your towels immediately after each use and store them in a protected container, like large zip lock bags or a Rubbermaid bin. For more information about microfiber care visit “Microfiber Towels and Properly Caring for Microfiber“.

It is common to see the middle of a microfiber towel worn out while the edges look almost new. The problem with this is that the outside edges are still of high quality and safe while the middle may be contaminated and possibly dangerous to use on delicate surfaces like the clear coat. To maximize the functionality of the microfiber towel (16” x 16”) we recommend folding it in fourths while exerting pressure evenly across the towel. Folding the towel in fourths gives you eight different fresh surfaces to use and helps evenly distribute the wear and tear.

Microfiber Maximization

One of the primary functions of microfiber towels is hand removing excess polish, wax, etc. from the clear coat. After you have applied a wax over a small area fold your microfiber towel in fourths and remove approximately 80% of the excess product. Then flip the towel to expose a fresh side and remove the remaining 20%. This method gives you a fresh side of the microfiber towel to remove the remaining excess product, which better ensures you leave no residue behind. When you start to remove excess product from the next small section do not flip the towel, instead remove approximately 80% of the excess product. Then flip the towel and remove the remaining 20% and repeat the process.

Eventually all towels become too contaminated or worn out to be safely used on delicate surfaces. If you are unsure if a microfiber towel is still safe to use test it on the back of a CD. We recommend you categorize your microfiber towels into three different levels. The first level is for towels in pristine condition that will only be used on delicate surfaces. In time these towels will be downgraded to the second level, where they are used primarily for interior cleanings, glass care, leather care, metal polishing, etc. The second level is reserved for towels still in good to excellent condition but with slight wear. Eventually these towels will be downgraded to the third level where they will help clean the door jamb, engine bay and other contaminated areas. Heavily contaminated towels or towels with large abrasive particles may need to be discarded. We recommend storing and cleaning the different level towels separately, to help keep them in the proper level. Inspect each towel after each cleaning to ensure it’s in the proper level.

If you follow these tips you should be able to get more efficiency and functionality from each microfiber towel you have. This means more value from your purchases and better results at the same time.

Leather Care You May Not Think Of

November 1st, 2007

No one likes to see their leather fade, crack or stretch, yet this is an extremely common problem. As most people are aware, good leather care involves a regular routine of cleaning and conditioning. Cleaning your leather helps remove contaminates that become embedded in the leather and clog the leather’s pores. Conditioning helps replace proteins and other natural properties that can fade over time due to normal usage, UV rays, etc. These basic steps are essential elements to good leather care but there are other ways to care for your leather that are just as important.

The driver’s side bolster, or the part of the driver’s seat closest to where the driver enters and exits the vehicle, often shows the most wear and tear. This area is prone to stretching and cracking due in large part to the method by which the driver enters and exits the vehicle. Often times while entering the vehicle you will sit down on the edge closest to the door and slide into the middle of the seat. While this method is natural to most people, there are two basic problems with this technique. Most seats are slightly concave with the lowest point being in the middle of seat. Therefore when you sit on the edge you force the leather to flatten, which stretches and flexes the leather, especially on the outer edge. If you repeatedly stretch and flex the leather you may prematurely start to add permanent creases, cracks and stretch marks to the leather. The second problem is when you slide and twist your body to move from the outer edge to the middle of the seat. Your body’s downward force will generate plenty of friction to start to slowly wear away the top layer of your leather. This can lead to your leather looking worn and faded and this damage is generally permanent. These same exact problems happen in reverse when you’re exiting the vehicle. Most people twist and slide their body towards the outer edge of the seat and then exit the vehicle. To help prevent these kinds of problems try and reduce how much you slide and twist in your seat. Instead lift straight up and down when entering and exiting the vehicle. This simple step can be a tremendous help towards preserving your leather.

One step that should be apart of everybody’s routine is protecting your leather. Ultra Violet rays from the sun can dry out and fade your leather. Heat helps opens the pores of your leather, which allows proteins and other nourishing elements to evaporate more readily. Without these properties leather becomes less flexible which can lead to fading, cracking and stretch marks. After you have cleaned and conditioned your leather you can protect your leather with a product like the 303 Aerospace Protectant. Lightly mist the protectant on a microfiber towel outside of your vehicle, to avoid overspray, and wipe down the seats. Make sure you regularly protect areas that have prolonged exposure to the sun. A good protectant will also make it easier to remove contaminates and oils during future cleanings.

Here are some other areas of concern that you should be aware of to help care for your leather. Be careful that your seatbelt does not regularly rub against the leather. Always use safety first, but adjust the belt accordingly if it’s potentially damaging the leather. Be careful of what you and others wear in your vehicle. Some articles of clothing and jewelry can be sharp or blunt like buttons, rivets, and zippers that can potentially scratch or otherwise harm your leather. Human oils, lotions, make-up and contaminates that are commonly found on the human skin can prematurely dry leather. Avoid touching your leather excessively and wipe down any areas that regularly come in contact with human skin.

Try and observe any other habits you may have that may be harmful to your leather, and see what you can do to minimize them. Follow the tips listed above and regularly clean and condition your leather and you’ll have leather that always looks great.

How soon can I detail [or wash] my brand new vehicle?

October 21st, 2007

I see the question asked quite a bit, “When can I detail [or wash] my brand new car?” . The answer is simple, the sooner the better. Many people have the misconception that the paint has to cure so many days after receiving a new car before they apply a coat of sealant or wax. New vehicles typically undergo a process that bakes, or heats up, the painted shell during production. By the time this process is over and the vehicle reaches its destination, the paint has typically had enough time to fully cure.

When you get work done from a body shop, the paint typically needs between 30 – 120 days of cure time before you should apply your favorite sealant or wax.   This means you can still wash and dry, clay bar, polish and glaze your vehicle.  It is best to ask the place that performed the paint work exactly how long you should wait for the paint to cure.  Different shops use different products and techniques during the painting process which can vary the cure time.

Stoner Tarminator – Bug & Tar Remover

October 21st, 2007

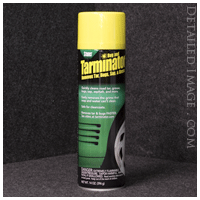
Stoner TarminatorDetailed Image is proud to announce a new product we have picked up from the makers of the popular Stoner Invisible Glass, Stoner Tarminator. Tarminator is an excellent product for dissolving , such as bug smear, tar, sap, and other stubborn road contamination. Simply spray this product onto your paint where the contamination resides and let it dwell for a minute or two. Quite often you’ll see the contamination dissolve right before your eyes. This product is best used before a wash as a pre-wash degreaser. This product is powerful so you will want to reapply your protection, whether a sealant or wax, after using Stoner Tarminator.

Circular vs Straight Line Hand Applications

October 5th, 2007

There seems to be a lot of confusion over what hand application method works best or is the safest (straight lines vs. circular motions). The major difference between applying products in a circular motion verse straight lines is your coverage. I feel a circular motion allows you to work in a product more evenly and hit areas at multiple angles for a more thorough application. This is especially important when polishing for best results. The same thing applies for a wax or sealant that you want to be applied to every microscopic peak and valley in the clear coat. The Porter Cable 7424 moves in an oscillating pattern which is basically a tight circular motion meant to replicate circular hand movements. This results in very good product breakdown and coverage for a thorough application.

Some people feel that a circular motion will create micro-scratches in a circular pattern in the clear coat. Therefore with that logic, they feel straight hand motions will only create straight micro-scratches that are less noticeable to an observer. If you are creating micro-scratches in the clear coat your problem lies in your prep work or products and tools used during the process, not your technique. If micro-scratches are being added you may be experiencing one or more of the following problems:

– You are using a contaminated applicator pad
– You are using a non-paint safe applicator pad
– You are using a contaminated removal towel
– You are using a non-paint safe towel
– You are applying a product over a contaminated area

    With any one of the above situations you can easily be grinding in contaminates in to the clear coat which can cause micro-scratches regardless of your technique. Additionally the same concept is true if the applicator or removal towel you are using is too coarse. Some common problems we see are people using an applicator pad or removal towel that has old and dry product (i.e. wax) in it or a large piece of contamination that’s abrasive. Contaminates and old product can become lodged in an otherwise good applicator or removal towel and make it a potentially dangerous tool. Contaminates left on the surface of your vehicle can also be very dangerous. To decrease the risk of grinding in contaminates make sure you do a thorough wash with a pre-wash degreaser and use a clay bar to deep clean the micro-ridges of the clear coat. When wiping an area that has contamination you may loosen the contamination or part of it. These contaminates can then be grinded in to the clear coat or become lodged in your applicator or removal towel. It’s very important to regularly inspect all of your towels, applicators, buffer pads, etc. for contamination that could be potentially dangerous and replace as needed.

    Differences between Porter Cable 7424 and generic buffers

    October 5th, 2007

    While each buffer is different I’ll point out some common differences between the Porter Cable 7424 and some of the “generic orbital buffers”. Some of these differences are subtle, but noticeable if you really want the best results. I’ll highlight some of the main differences and why they are important.

    One of the best things about a Porter Cable buffer is you can attach a velcro backing plate to it. The velcro backing plate allows you to use various pads, such as the Lake Country foam pads. Changing pads takes only takes a few seconds. The Lake Country Pads are clear coat safe designed to complete each step of the detailing process with maximum results. If you want to remove swirls and imperfections you can use a more aggressive pads or if you want to apply a wax there are nice soft pads, etc. These pads are particularly important for polishing to attain maximum results.

    Generic buffers typically use terry cloth bonnets that have several downsides. Some terry cloth is manufactured too firm and can potentially mar the paint. While doing the detail you most likely wouldn’t notice these micro scratches because if you are applying a wax, the wax is covering it up. However after detailing for years I’ve come to notice that some terry cloths can really harm the finish, especially as the bonnet becomes contaminated and worn down. Terry cloth is also very thin which means it can’t absorb contaminates that separate from clear coat while buffing as well as foam pads. These contaminates can grind into the clear coat, where as foam pads are better designed to absorb contaminates into its 1.25 inch thick pad. These pads are very durable so you can clean them and use them over and over again. Some generic buffers have a jerky orbital motion and far less OPMs (Orbits Per Minute), which is essential for effective polishing. The Porter Cable 7424 has a speed dial that allows you to change the power from 1 – 6 or from 2,500 to 6,000 OPM, while many competing buffers just have 1 or 2 speeds. Polishing is the step where you remove swirls, oxidation and really brighten the clear coat for maximum shine. The 3.7 amp motor is very powerful and does a great job of building consistent heat and pressure. Despite this powerful buffer it’s also very safe and has minimal risk of harming your paint. Many traditional orbital buffers require you to have two hands on it, which makes it very difficult to buff very low panels, corners, center of the roof and hood. The Porter Cable’s smooth motion and light weight (7lbs) make it very easy to maneuver around corners and near trim with one hand or two.

    One of my favorite parts about the Porter Cable 7424 is its reliability because I really feel like you get what you pay for and it’s backed with a one year warranty. This is a super durable machine that you will be detailing with for years to come.

    « Newer PostsOlder Posts »
    My Offers
    20 Off Labor Day Sale
    Quantity Discounts - Buy More, Save More!
    Free Stuff
    Big Discounts While Supplies Last - Clearance Items - Shop Now
    Close overlay