Photography Tip: Create a Sunburst Effect in Your Photos
by Zach McGovernMost detailing enthusiasts enjoy capturing photos of their work to share with friends, family, and the detailing community in online forums.
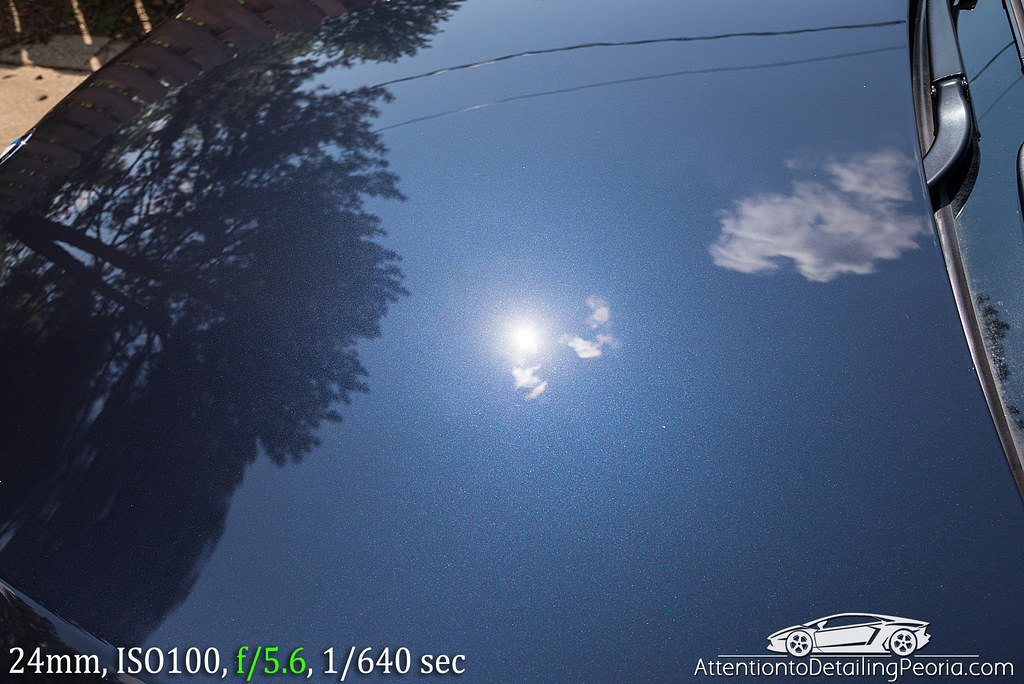
One of the most important shots to show that you really nailed the paint correction process is the overhead sun shot in which a direct reflection of the sun is captured on a nicely polished panel as seen below. As we all know, inspecting your work in the sun is the true test in demonstrating your paint correction skill, so why not show it off.

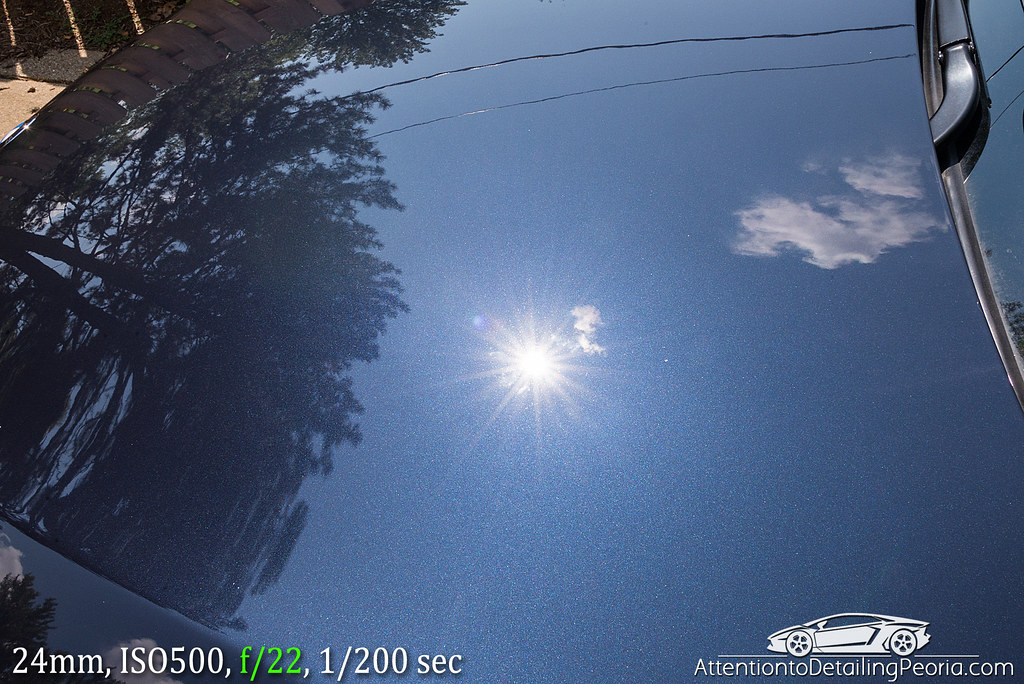
The image above is effective in demonstrating the lack of defects in the paint as seen in direct sunlight, but overall it is just kind of boring. An easy way to add some interest to the photo is to create a sunburst reflection of the light rather than a simple circular reflection. This is done by manipulating the aperture of your lens. If you’re shooting with a DSLR or a more advanced point and shoot that allows you to manipulate your exposure settings, you will need to be in either a fully manual mode or a semi-manual mode, such as aperture priority mode, in order to make these changes.

Notice in the first image, the f-stop value is set to f/5.6, which is a relatively wide. In order to produce a sunburst, the aperture must be closed to a narrower f-stop. I have found that this effect is most easily obtained at apertures of f/11 or narrower, however you’ll likely not want to exceed f/22 as diffraction will lead to a loss in image quality. If you’re shooting in a semi-manual exposure mode, your camera will compensate for the lack of light entering the lens due to the narrower aperture by slowing down the shutter speed and/or bumping up the ISO. If you are shooting in manual mode, you will need to adjust these settings on your own to maintain a proper exposure.

This can be a fun effect to use anytime you have bright reflections coming off of any part of the vehicle. Hopefully this simple tip will help add some more interest to your photos as you show off your abilities as a detailer.


I either forget to take the before or the after or all together forget to take a photo. I see a vehicle that will be a really good before or after and I get excited and just start in on the project. I’m also not the best photographer and feel my photos aren’t up to par with what I see for other good detailing websites. Also the time it takes to edit the photos and to put the before with after is quite time consuming.
I thank you for the information hopefully it will inspire me to take more photos.
Hey Daniel – Photographing the job you’re working on certainly can add considerable time depending, however the results are always worth the time in my opinion. When documenting a paint correction job, being able to show a customer a 50/50 shot or before/after shot they will really understand what you were able to accomplish. The marketing potential is also great… I can honestly say that without taking the time to thoroughly document some of our work and share in depth write ups on our website and on social media, we would not have the same success we have today. You’ve just got to get in the habit of snapping some pictures along the way.
Nice! I gotta try this!
Great tip and another superbly written article Zach as always .
Although I’ll admit I honestly didn’t realise this was an “effect”! I thought this was genuine unedited sunlight on corrected paint and always wondered why my finished vehicles didn’t have the same look – I thought it was my technique letting me down, didn’t realise it was the camera!
Will definitely be trying this on the next vehicle I work on.
Lee – this is NOT an effect. It is genuine and unedited. All that is changed is the aperture setting on the lens. If you are not familiar with photography, your exposure is a product of 3 main settings: Shutter Speed, Aperture, and ISO. Each of these 3 settings effect the final outcome of your image in some way, and manipulating them can create a different look. For instance, if you want a soft, blurry background a wide open aperture is needed. If you want to produce sun stars, you need to use a narrow aperture as explained in the article… none of this was done in photoshop or anything like that. Let me know if you have any questions.
Sorry Zach, I didn’t mean effect in that way, more that it was due to settings on the camera.
I’ll definitely be trying this, along with some of your other tips. I need to spend longer on the photography side of things, as at the moment I just take a couple of before/afters and a few 50/50s on my phone and that’s it!
I’ve just been looking at your website and the level of work is absolutely incredible, both from a detailing and photography point of view. Very impressive.
What polishing combinations did you use for the 2014 Porsche Cayenne S out of interest?
Thank you! – understanding photography and spending some time and money capturing your work properly will make a HUGE difference in the ability to market your services and therefore lead to more work at a premium price. Thankfully my photography background played nicely into starting a detailing business.
A full write up on the Cayenne S will be featured here on the Ask-A-Pro Blog whenever the editors decide to publish it. That vehicle was compounded with Griot’s Garage Fast Correcting Creme & Microfiber pads and then polished with CarPro Reflect with Rupes yellow pads.
Thanks for the prompt and detailed responses Zach, it’s much appreciated.
Looking forward to reading the Cayenne write up!
I love your Pictures it literally brings the Cars to life. What camera and lens do you use?