Sometimes it’s the small things that make a big difference between a good looking car, and a great looking one. Your paint can look fantastic, but if you haven’t taken the time to properly detail areas such as the wheels, wheel wells, glass, or the exhaust tips, then the job simply isn’t complete.
Perhaps the most frequently overlooked area is the exhaust tips. Although it can be a bit of a messy job if they’re neglected, it’s actually quite simple and doesn’t require a tremendous amount of time to do it right.
Not only does it make the car look much better when the exhaust tips are detailed, but it also prolongs the life of the finish, which is usually stainless steel or chrome. Similar to wheel care, if neglected the finish on your exhaust tips will start to corrode, pit, or discolor. With regular maintenance however, they will stay looking nice for a very long time.
First let’s take a look at the exhaust tips on this 2005 BMW M3. As you can see, they’re in need of some serious work! Upon my initial inspection, I could tell that they were showing signs of pitting on the outside, and permanent etching on the inside towards the end of the tips.
I’ll work on the wheels and exhaust tips first before washing the car so that I don’t get any residue/overspray from them onto a freshly cleaned painted surface.
I’ve got my buckets ready and supplies staged, so let’s get busy! Once again, here are the exhaust tips before I got started.
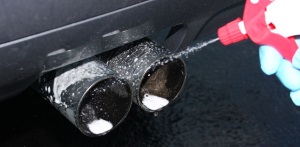
First I start by spraying down the inside and outside of the tips with Chemical Guys Grime Reaper APC at a 5:1 ratio. It’s shipped as a concentrate, so you’ll want to get a DI Trigger Spray Bottle to mix your solution in.
After letting the APC dwell for a minute to start breaking down the grime, I’ll clean the outside part of the exhaust using either a Mini E-Z Detail brush (they are perfect for cleaning the areas between a dual-tip setup like this one), or an old microfiber towel that I strictly use for dirty jobs.
Now it’s time to use some 0000 steel wool (very fine grade) with the CG Grime Reaper to clean out the insides of the exhaust tips.
Take a look at the dramatic difference between the two sides…and this is even before polishing!
After I cleaned all 4 tips in the same manner, I washed and dried the M3 (and polished it), and am now putting all of the finishing touches on the car.
Your exhaust tips are now clean, but if you want to take them to the next level, I recommend polishing them up a bit both inside and out. Here I am using Optimum Metal Polish and 0000 steel wool on the insides of the tips.
Now I’m moving on to the outside of the tips once again with Optimum Metal Polish and an older microfiber towel that I no longer use for the painted surfaces. If there’s a grain in the finish, then be sure to polish with the grain. Another product that I like to use on the outside of exhaust tips is Klasse All-In-One.
All finished! As you can see, the insides of the exhaust tips have a bit of permanent etching from infrequent cleaning, but they look much better, and will remain that way with simple cleaning during each wash.
The M3 looks great, and the bright exhaust tips add a professional finishing touch!
Here are a few other examples of finely finished exhaust tips:
Z06 Corvette:
BMW M6:
GT500 Shelby Mustang:
Buy Products From This Article
Purchase the products used in this article individually or in one convenient package here!
