Analyzing Your Test Spot
by Zach McGovernI am often asked what process and products should be used on a vehicle to remove surface defects and produce a glossy finish. Whether I am inspecting a car for a potential customer, or answering a question for an amateur/enthusiast, the answer is always similar … “I’ll need to do a test spot to be certain”.
A test spot will allow you to evaluate many things such as the severity of the surface defects and how the paint reacts to correction. It is important to remember to always use the least aggressive method possible to achieve your desired results. As the following photo shows, OEM clear coat is a thin, and valuable part of the paint system. Learning to use the least aggressive method of correction will help to preserve the clear coat on the vehicle.
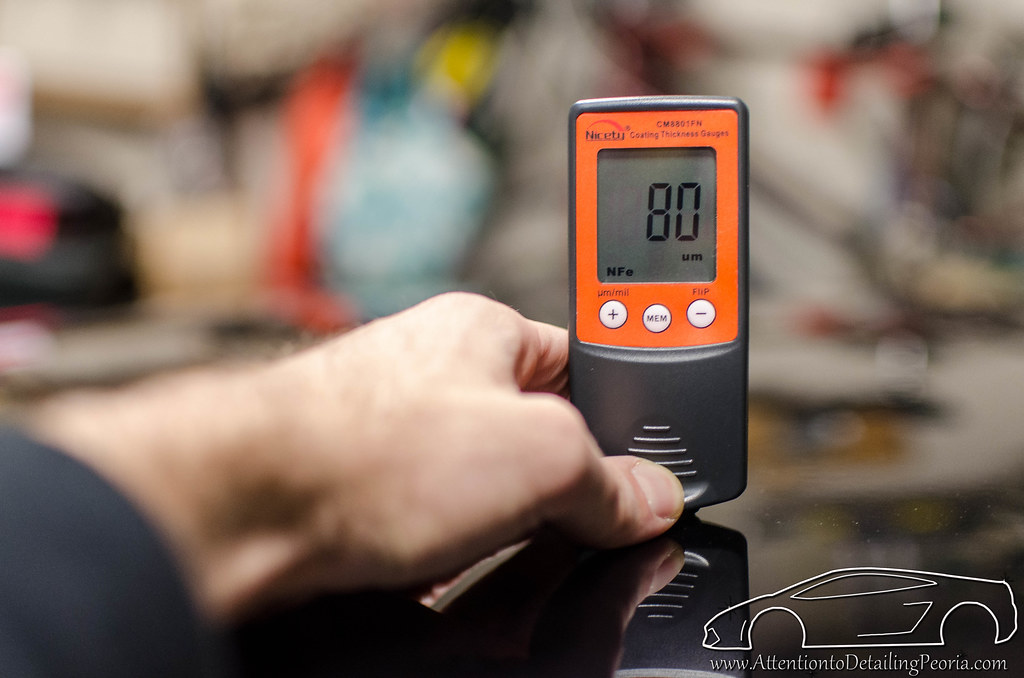
Photo: Electronic Paint Thickness Gauge (i.e. Defelsko) shows the paint thickness of a new Audi SUV. Note: This measurement is total thickness, including primer, base coat, and clear coat, therefore clear coat is only a fraction of this measurement. To give you a point of reference, a sheet of standard computer paper is slightly thicker than the reading shown above (~95 microns according to an online source).
Performing the Test Spot
Before proceeding with any paint correction, be sure you have properly washed and decontaminated the exterior surfaces. You may be surprised at what can be hiding under a layer of glaze, wax, and/or contamination. Once the surface is completely clean, it is important to inspect the paint with proper lighting. This will give you an idea of the condition of the paint before you begin your testing.
If you are working on a vehicle for the first time, it is always a good idea to begin with something very tame, like a light polish and a polishing pad (Example: Meguiar’s M205 on a White Lake Country Polishing Pad). Vehicles that have softer paint often do not need any more than this to achieve some pretty great results. Once you gain experience with many vehicle makes, models, and colors, you may be able to start making more educated guesses regarding the proper product and pad combination that will be needed to achieve your desired results based on the initial condition of the paint.
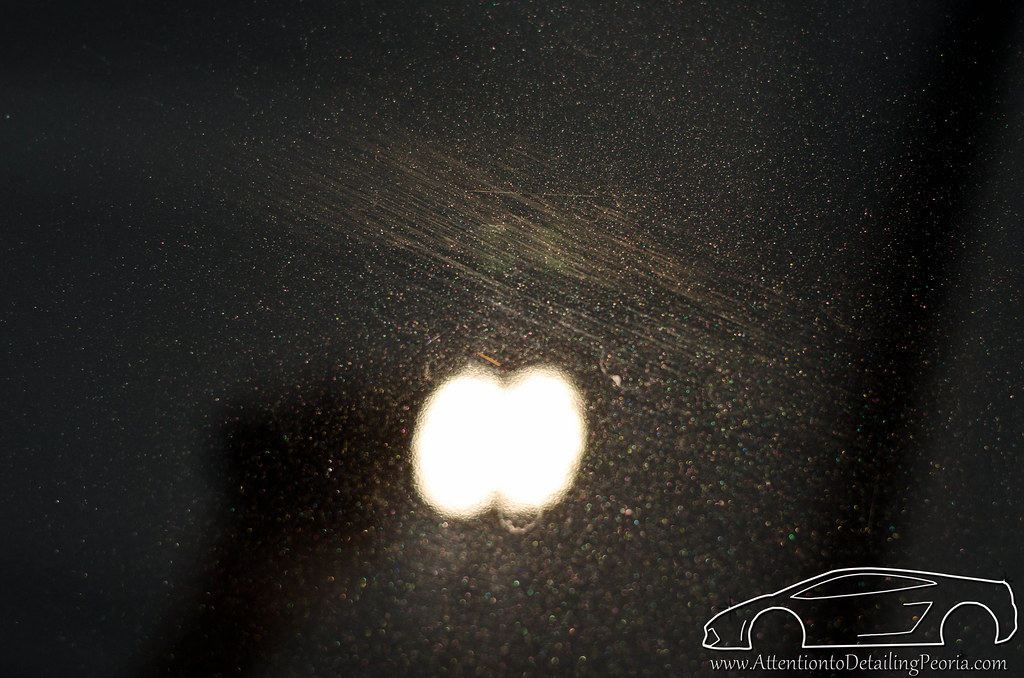
Photo: The previous image shows light marring, however due to the perceived hardness of the paint, a medium polish was required to remove even these very faint scratches.
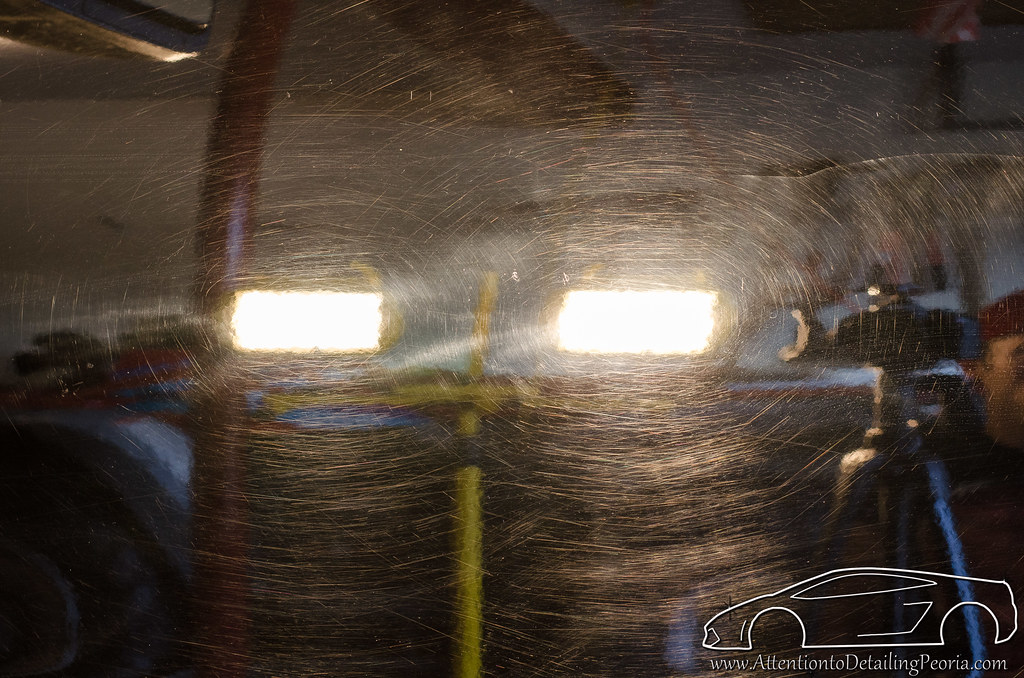
Photo: The previous image shows some heavily neglected paint, however since the paint was quite soft, a Lake Country Orange Light Cutting Pad and cutting compound was able to remove the vast majority of defects. It was then refined with a final polishing step.
I tend to do my test spot (or spots) on a large, flat surface like the hood. I like to tape off a small square (approximately 2×2′) and then polish the area with my first test product and pad combo. The tape lines give me a very easy way to compare my test spot to the original paint. Once I have polished the section, I will remove the tape and examine my results very carefully with proper lighting.
Evaluating Your Test Spot
It is important to examine your test spot to determine if you need to change your working variables to alter your results.
Things to look for:
- Remaining Swirls – If you notice there are still a significant amount of swirls or other lighter defects remaining after your test spot, it is often a fair assumption that you were not being aggressive enough with your initial test. You may need to change your product, pad, technique, or some combination of these variables to improve your results.
- Random Isolated Deeper Scratch (RIDS) – If the swirls and other light to moderate defects have been removed, but heavier defects remain, you have a decision to make. Do you want to go more aggressive (i.e. remove more paint) in order to remove the heavier defects, or did your initial test produce your desired results? For many daily driven vehicles, it is often OK to leave the deeper defects alone as you do not want to remove more clear coat than you need to, however this is ultimately up to the customer. Remember to use good judgement in these situations. Don’t chase deep defects if your paint readings are particularly low. It simply isn’t worth the risk in my opinion.
- Micro Marring / Haze – If you notice micro marring, you have either been too aggressive with your test spot, or you simply need to follow up with a finishing polish to refine the area. If you were only dealing with minor defects, you should hope to be able to finish without marring and therefore no need for a second polishing step. If this is the case, perform another test spot with a less aggressive method and examine your results to see if you can achieve a similar level of correction without producing any marring. If you were dealing with more neglected paint that required compounding to achieve the desired level of correction, it is common to see marring afterwards that needs to be refined. In this case, you simply want to ensure you were able to remove the original defects with your cutting process, and you will then want to do another test spot with a finishing product to ensure you can effectively refine the haze left from the compound.
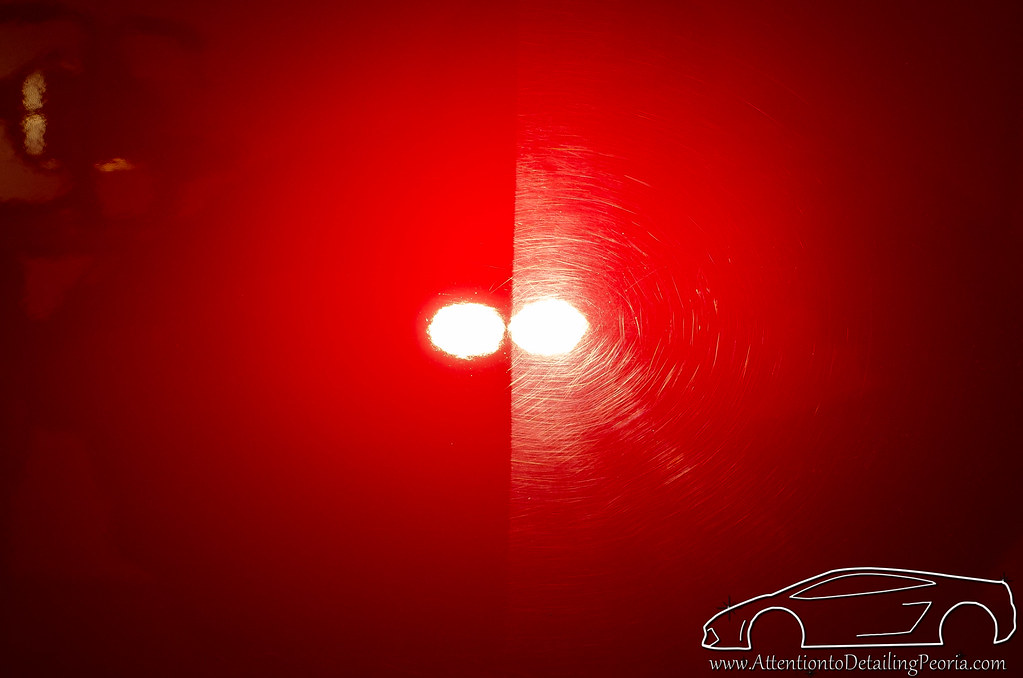
Photo: The image above shows a test spot that removed the vast majority of light to moderate defects (swirls), while also finishing down without marring. This is the key to a one-step correction.
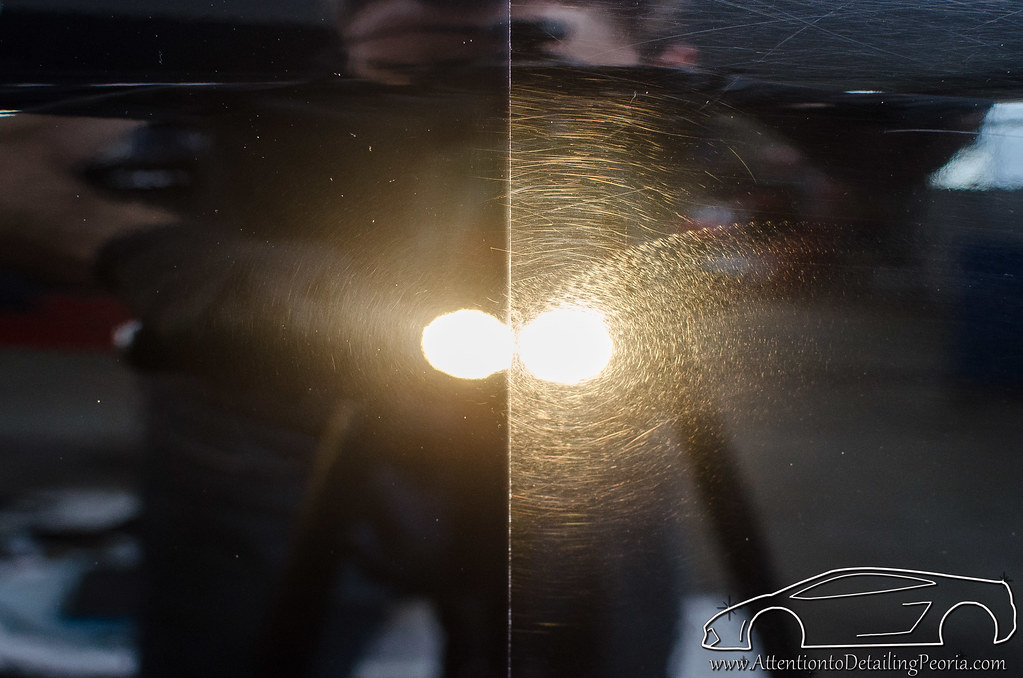
Photo: The previous photo shows heavily neglected paint that required heavy cutting. As expected, this process left a considerable amount of haze/marring. This needs to be refined with a final polishing step to produce a flawless finish.
Altering Your Correction Process
- Product & Pad Combo – The combination of product and pad is the first key in a successful paint correction process. It is worth noting that the aggressiveness of a product is dependent upon the pad you are using with that product. For instance, you can use a light polish with a cutting pad to get more cut, and you can use a cutting compound with a finishing pad for less cut. Once you begin to realize that there is no “right product/pad combo” you can learn to fine tune your product/pad combo to produce the best cut and finish possible.
- Machine Speed – Adjusting your machine speed will also yield different results. In general, faster speeds are often used for heavier correction and slower speeds are used for fine polishing. Speed can also be changed throughout your working cycle. You may start with a faster speed for more cut and finish with a slower speed to promote a better finish, don’t be afraid to experiment!
- Pressure – Pressure is another variable that must be accounted for when determining the best method of correction. Typically, more pressure yields more cut and less pressure yields less cut. Keep in mind that you do not need to maintain constant pressure throughout the polishing cycle. You may find that you need to start with heavy to moderate pressure to produce the desired cutting power towards the beginning of your working cycle, and then gradually reduce pressure to produce a better finish.
- Arm Speed – Slow arm speed is key to most paint correction processes. This is a component of the technique that is often overlooked or forgotten about by amateurs. You must allow enough time for the abrasives in the compound or polish to work against the paint. If you are moving too quickly, you will not achieve the desired results.
Overview
A test spot is a critical point in the correction process. This test, or series of tests, allows you to develop a plan of attack that will produce consistent results throughout the entire vehicle. Many paints and polishes react differently, so there is no guaranteed formula for success. Experience will help speed up your selection process, but there is nothing wrong with taking your time to determine the best possible correction process. In general, you should aim to produce the desired level of correction in no more than two steps. The products available today allow for heavy cutting power (when needed) with an overall good finish that should be easily refined with a single polishing step. There are always exceptions to this, as every situation is different, but for the vast majority of situations, a two-step process is going to yield fantastic results.
As always, thanks for reading!


Thanks Zach for the tips. This summer will be my first time correcting the paint on my wife’s 09 black Subaru Forester. Her entire car looks like the 2nd photo in the article. Being my first time with polishing I’m a bit nervous but with the tips within the article I’m confident that I can produce great results. I’ve spared no expense with the products I’ve purchased (although I did go with the affordable and user friendly Porter Cable 7424XP per reviews.) I bought Menzerna FF3000 and SF4500, Chemical Guys Hexlogic kit with pad cleaner, as well as 3M auto masking tape for protection.
Thanks again for the article!
Hi Benjamin,
The Porter Cable is a very capable machine, and one that I highly recommend. I’m glad you found this article to be helpful, please don’t hesitate to ask if you’ve got any other questions now or in the future!
-Zach
Thanks for the info Zach. I’ve been learning a lot from this site and am new to correctly detailing although I’ve been big on washing / maintaining for a long time by hand. Ordered the porter cable 5.5 package and am going to correct the nbp paint on my 08 civic si. I’ve read the article on the TL in nbp along with many others. I’m confident I can get some excellent results. The car has been heavily neglected however, and looks worse than the last pic in this article. Can’t wait to get the blue flakes back! I’m planning on megs 105 with an orange pad followed by megs 205 on a white pad. -after a test section of course. Finishing with megs polymer liquid wax on a black pad. Any additional tips as I understand this paint is very soft? Thanks.
Hey Tony – thanks for reading and commenting.
That paint is typically quite soft, as you suggested, therefore I would begin my testing with M205 on a white or orange pad to see what type of correction you can get with that. Believe it or not, M205 on an orange pad can do a lot of correction on softer paints when paired with proper technique. M205 is easier to work with (compared to M105), and you will be preserving clear coat by not jumping directly to a heavy cutting compound like M105. If that does not produce the correction you are seeking, you may need to step up to M105. Spend the appropriate time to test your process and dial it in. Hope that helps!
Thank you Zach for such a well written and informative article. I have been detailing my cars for over 20 years by hand and have recently purchased a PC 7424 XP to make the application of polish, sealant and wax easier on myself. I have a 2008 black Ford F150 that has been washed and waxed by hand since the day I got it. The paint is in excellent condition considering it sits outside 24 seven and living in the Northeast it is exposed to some pretty harsh elements. The clearcoat does have some very fine scratches and some small water spots on the hood. When I first got the machine my temptation was to try to create a show car finish but taking advice from your article on using the least aggressive product to get desired results. I have opted instead to use products that will end enhance the appearance of my truck by hiding those minor imperfections without abrading and diminishing the clearcoat. Thanks
By polish I actually mean a glaze which is non abrasive and can hide imperfections…just to clear that up. Thanks
Hey Arthur, Thanks for taking the time to leave a comment! I hope I did not give them impression that polishing (with abrasives) is a ‘bad’ thing. A light polish on a yearly basis is considered routine maintenance by many people. Proper washing and drying will result in minimal marring/swirls, but a light polish can still be beneficial. A glaze, however, can also be a handy product if you’d rather cover up the defects for a more temporary fix. Glad you found the article helpful!
Zach – thanks for the advice. I will try the 205 with the orange pad first, especially since I have no experience using a real buffer. Last thing I want to do is overdo it. I’ve managed to somewhat clear up the fenders by hand, and the difference is huge. Can’t wait to see the results with the PC. (Not to mention the time saved and no more spaghetti arms.) Thanks again for the help, and keep up the good work! It’s nice to see a professional that can take the time to help advise us amateurs.
Always happy to help, Tony! Just like any new skill, polishing will take time and patience. Thankfully DA machines make it safe and easy to learn, so stick with it and you’ll have the best looking cars in your area in no time!
Fantastic article, to the point with superb photos. I especially appreciate the explanation of marring. I have been hand polishing my cars for 20+ years and just recently bought a DA. My recent used car purchase was heavily swirled, and hand polishing just would not cut it, pun intended.
My question, if you don’t mind, is compound vs polish. Specifically, I have Poor Boy’s World SSR2.5 and 3M Advanced Rubbing Compound. Which one of these is the most aggressive? The Compond occasionally leaves haze, the SSR2.5 occasionally leaves tick marks. Either of these “new” defects is easily removed with Menzerna PF2500. Can you shed some light?
Hi Richard, Thanks for the compliments! I’m glad you enjoyed this article.
Regarding the SSR2.5 and 3M rubbing compound – I personally do not have any experience with these products, however based on some quick research, it would appear that the 3M rubbing compound is a bit more aggressive than the poorboy’s SSR2.5. It is common for most heavy cutting products to leave some haze/micromarring behind. These products are not intended to finish down perfectly, they are meant to cut through defects quickly and you should expect to refine the surface with a medium or fine finishing polish. PF2500 is a great medium polish. I would bet that on many paint systems SF4000 would also work just fine in eliminating micromarring and leaving an incredible finish. Hope that helps!
Hi Zach,
I’ll just echo what others have said. Thank you for sharing your knowledge and techniques. If I may ask, do you have a light preference to aid you in your work?
Thanks…
Hey Steve,
Thanks for taking the time to read through the article! Regarding lighting, I find it is important to inspect my work with various different lights. I often keep my 1000W Halogen lights on as they do a fairly good job of showing swirls and RIDS when placed properly, but halogen lights do not show micromarring/haze. I find LED lights to be the most ‘unforgiving’ in that it highlights marring really well so you can be certain you are finishing down perfectly (the Brinkman xenon light is also good for this). Lastly, it is always a great idea to check your work in direct sunlight if at all possible since that is the lighting that the vehicle will be seen in for the most part. Hope that helps!
-Zach
Hello Zach
I would like to know if you had any experience with the harbor freight D/A buffer. Good starter or not ?
Trying to correct black paint on an 04 LS 430 giving me lots of problems.
I have some M105/205 and assortment of chemical guys pads.
Thanks for any help you can give me.
Hi Terrance,
I do not have any personal experience with the HF machine. I typically recommend the Porter Cable 7424XP or Griot’s Garage machine as 2 fantastic options for starters.
Black Lexus paint is typically quite soft and can be challenging to produce a perfect finish. What exact issues are you having?
(feel free to contact me directly at AttentiontoDetailing.Peoria@gmail.com for further discussion of your problems with the Lexus)
I got the car about a year ago and the paint is in bad shape it has a good shine in the garage but in the sun it terrible if I could get just the major defects out I would be happy. I would like perfect paint but I don’t think it would be possible with out a respray.
Hi Zach,
Thanks for the good reviews about your work using Carpro products. We are planning start good setup for Car Surface protection since we are in Pre-owned car business. We have lot of requirement who loves their cars. Can please send me the complete detailed process of using Carpro products. I am asking you this since you are the master of using these products. Your expertise will help to keep all our customers happy and also promote Carpro products….Hope to here from you soon and if you have any brochure then kindly send the same to Aravind@silverstarmotors.com.
Regards,
Aravind.
Hi Aravind,
This article did not mention CarPro products, however if you have any specific questions regarding CarPro’s excellent product line, please do not hesitate to contact me directly through my website, or reach out to Detailed Image customer service. Thanks!
Hey Zach I know this is an older article for me to be chiming in but you, Todd , chad (just to name a few) write absolute fantastic articles brother!!..when I first read these older articles about a month ago I literally spent 6-7 hours on my iPad soaking in all the awesome information you guys post on here!!..my detailing has gotten so much better and I thank you so much for the helpful articles man!!
Frank
Frank – thank you for the very kind words! I’m very glad this blog has helped you enhance your skills and knowledge of the detailing process… that’s our goal! If you’ve got any questions, or topics that you would like to see covered here in the blog, please let me know! Thanks again 🙂
Hello Frank,
We’re glad to hear that the AAP blog has been a helpful resource to improve your detailing! If you have any questions please feel free to email support@detailedimage.com or comment on the blog.
Thanks for reading the blog!
Always enjoy reading your tips, several times. As you mention doing a test spot after film builds have been measured is paramount to having a great finish. Clear coat film builds vary from car to car even from the same plant. Harvest time is the worst. Cure time, oven time, bake temps all play a role . A great reminder Zachary . Thanks
Thanks for reading, Don!!!
Article worth reading!
Thanks for your feedback, Derrick! This is an older article, but I still reference it all the time when explaining paint correction to others 🙂
Thanks Zach for your wonderful article. I am setting up my new car detailing business and in my town there are various those car centers where unprofessional paint correction is been carried out. i want to offer my customer a service with utmost care and with proper technique and technology. i was very much confused about those polishing tools and techniques, Specially between selection of microfiber pads or foam pads. and after digging up lots of blogs and google, i found your blogs very inspiring and motivational with correct knowledge and techniques. Specially this topic is ton of knowledge for me. But some pro detailers points out that paint correction without microfiber pads is nothing ! so please can you help what to choose ? shall i always use microfiberpads or just keep inventory of foam pads only ?